Quickly Change Scented Wax Melts

Quickly Change Scented Wax Melts

Scented wax melts are one of my favorite ways to change the energy in the room.


Scents can pick me up or calm me down depending on the fragrance.

However, something that’s bugged me for years is how to quickly change out the scent in a warmer without much hassle. Once the chunk has melted it’s difficult to get the wax and the smell out of the little bowl.

Wax melt sections are huge and can be quite expensive. I’ve picked the wrong scent before and my place smelled like… well, horrible!

I wanted to start over but it takes a lot of effort in order to change to a completely new fragrance let alone do it quickly.

Then one day it dawned on me – it’s so easy!


Remove the Wax

First, you need to get the old wax out of your bowl. Here are some options for that:

1. Freezing Option:   Put the bowl in the freezer for an hour and it will pop out easily. Turn it upside down and give it a slight whack on the counter. If you have issues use a butter knife or spatula to get it started.

2. Heating Options:

Microwave: Put the bowl into the microwave (make sure there is no metal in the bowl). Start with 15 seconds and repeat a couple of times. Then drop the time to 10 seconds and repeat until it melts. Microwaves vary depending on the power, so it’s best to start slowly. It will melt quickly so be careful.  

Oven: Put the bowl into a conventional oven set on 170-175 degrees (F). Put the bowl on a cookie sheet lined with paper towels (in case of spills) until it melts. Be sure to monitor it while in the oven at all times. Again, it will melt quickly so be careful.

After melting, pour the liquid wax into paper towels before it cools. Then, using a couple more clean paper towels quickly wipe the bowl out. Paper towels help to absorb the wax so it doesn’t make a mess of your garbage container.

Note: Sometimes a very slight fragrance residue is left. Not to worry though, see below.


Removing Fragrance from the Bowl

The good news is... that once the wax is out of the bowl you can get rid of most of the smell right away by:

Reheating again. After the initial melted wax was poured out and wiped down, return the bowl to the oven at 170-175 degrees (F) for another 15 minutes or so which will help most of the remaining fragrance to burn off as well as melt any left over wax. Wipe out with fresh paper towels again.

OR: Wipe down with “Goo Gone” and wipe out with paper towels. Follow up with dish soap and water so that you can get the “Goo Gone” off the bowl, otherwise it will smell like orange engine cleaner and I don’t think that’s the scent you’re going for – lol!

OR: Let the bowl sit for a few days. The scent will fade over time, but this isn’t really necessary unless it was particularly hideous. Even then, heating or Goo Gone are really your best bets.

Once you get the wax out of the bowl feel free to use the bowl immediately. Any lingering scent will also tend to dissipate the first time it’s heated by the candle or heating element (if using an electric warmer) and should be gone within a few days.    


Now, the Quick Change Solution…

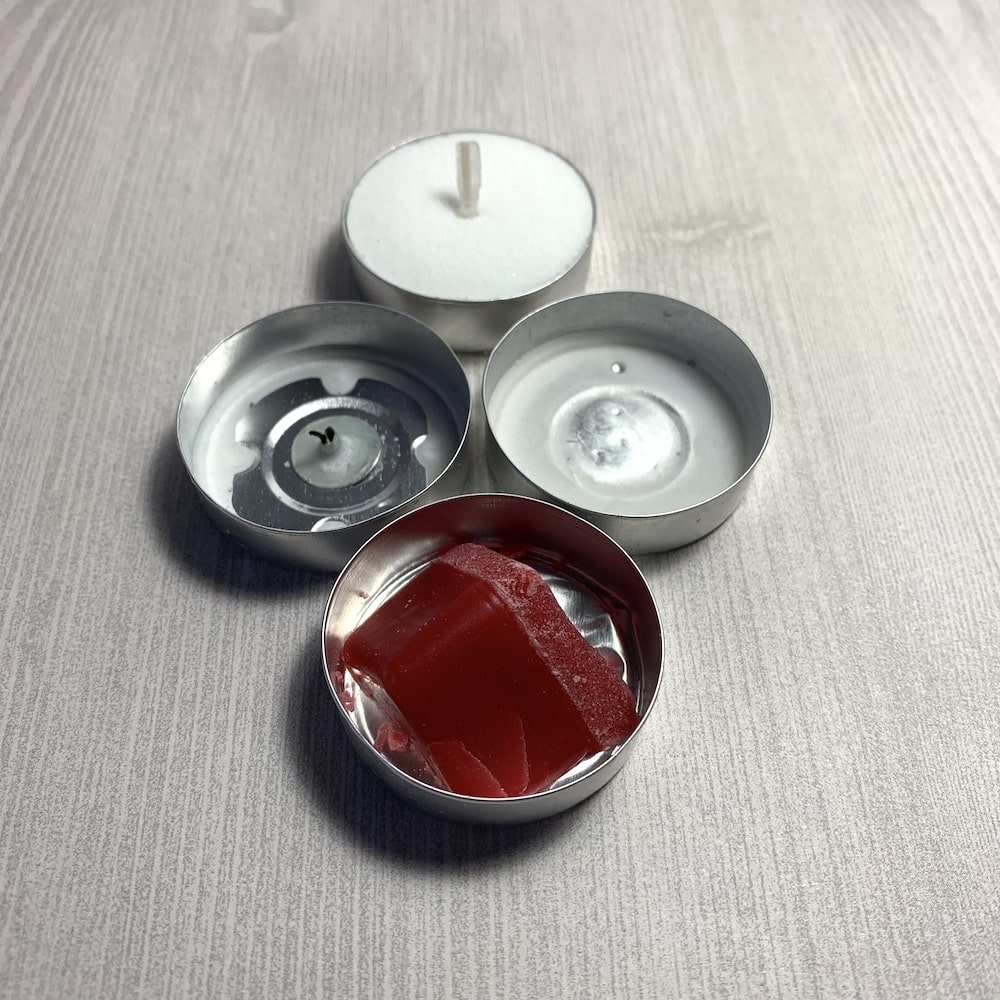
Instead of putting the melt directly into the warmer’s bowl, I used a spent aluminum tin from a tea-light candle for each scent. Whenever my tea-light candles finish burning, I pull the wick out and save the tin in a bag for future melt holders.  


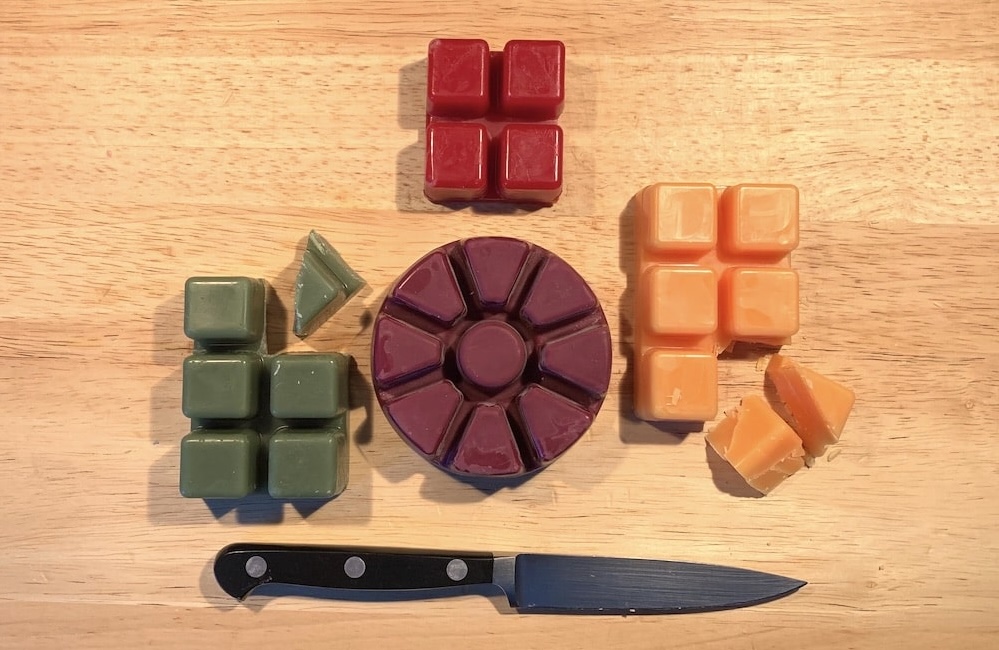
Save money by cutting the melt in half

Commercial melts can be silly expensive and you don’t really need to use a whole cube or wedge. There are loads of different wax melts out there and they are all super concentrated.

  1. Cut a melt in half and put it into an empty tea-light tin. I have found that a 1/2 cube of melt will fit nicely in a 1/4″ high tin.
  2. Place tin into your warmer’s bowl – TaDa! You’ll find that it will still fill your room with glorious fragrance while only using half as much.
  3. After they’ve cooled, you can keep them in separate plastic bags or jars for use later on.


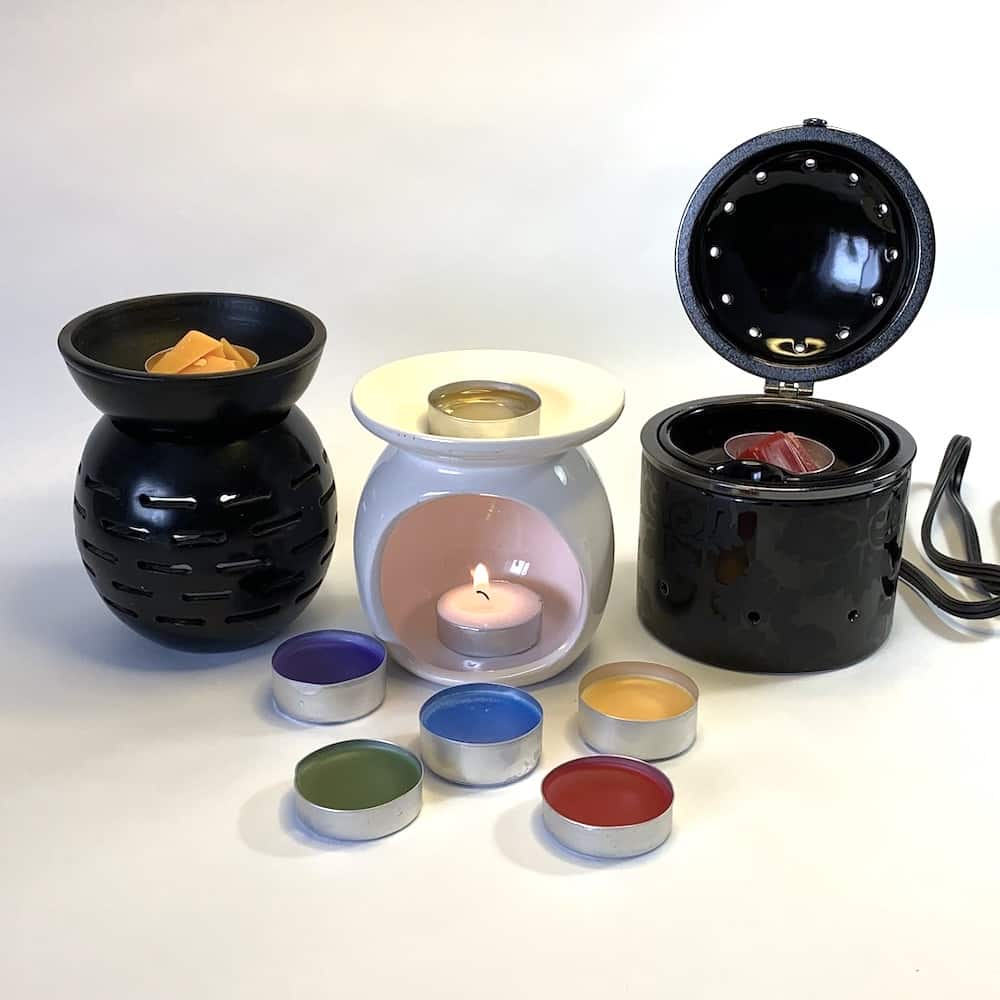
This also works with electric warmers!


When the fragrance in the tin has been used up you can either:

  1. Pour the melted wax into a paper towel and put it in the trash. Then, just refill the tin with a new chunk of the same fragrance.
  2. Or: Recycle the tin. Because the tin is made of aluminum, you can also put it in the recycle bin after removing the wax.


That’s all there is to it!

No more heating bowls, using cleansers, or taking time out of your already busy day to focus on something that’s supposed to bring you peace. Now you can change scents on a whim and focus on more important things like, getting on with your day.


Here’s To Fragrant Moments!


Views: 0

Drunken Cherry Chocolate Recipe

Drunken Cherry Chocolate Recipe

Chocolate is great for soothing stress.

These cherry chocolates will put a smile on your face – with or without liquor! They are easy to make and fun to eat.


Ingredients


1. Cherries: Large, pitted sweet cherries – frozen or fresh (10-12 cherries per tiny liquor bottle works well)

2. Favorite Liquor: Use your favorite. I personally recommend Rum for cherries. Omit liquor for alcohol-free Cherry Chocolates

3. Chocolate for Melting: You have options: Ghirardelli Melting Wafers (as seen in the photo), standard chocolate chips, or small chocolate bars.


Instructions


1. Soak Frozen Cherries for 24-48 hours in Rum, Whisky, Vodka (or whatever you want really).

2. If not using liquor, be sure to defrost cherries first. Then drain excess juice. Skip to step 4.

3. Drain liquor (after soaking) back into the little bottle for a second batch (or into a shot glass – makes an excellent cherry flavored shot while you finish making the candy – lol!)

4. Pat cherries dry and set aside.

5. Melt chocolate in small bowl. Do not add water or they won’t harden properly.

  • If melting chocolate in a microwave be careful to start slow. If using a small amount, begin with 20 seconds, then stir. Heat for another 20 seconds, stir again. Repeat with 15 seconds if necessary. Always stir between heating sessions until all are melted. Don’t overdo it or they can scald. OR Follow instructions on the package. Use melted chocolate quickly.
  • CAUTION: I have found that if you re-melt “Hershey’s” chocolate bars in a microwave more than twice, the molecular structure of the chocolate changes. Basically, it becomes rubbery and it won’t stick to anything, not even something super dry like a pretzel – it slides right off. So be sure to use the melted chocolate quickly. The Ghirardelli re-melts quite well.

6. Roll cherries in the chocolate and place them on parchment or wax paper, or put into little paper cups.


7. Let chocolate harden in fridge. Store in fridge – that is if they don’t all get eaten – lol!


Variations


Works great with Blueberries, Raspberries, and Blackberries too!

  • Follow the recipe above but substitute the cherries with your favorite berry.
  • Roll the small berries around in the chocolate coating them all.
  • Drop single or multiple berries in little clusters onto parchment or waxed paper.
  • Let chocolate harden.

With regard to liquor choice with Blueberries, I personally prefer Vodka. It has a brighter flavor.

Mostly, just experiment and Have Fun!


Chocolate Cheers!


Views: 0

Which Straw is Better: Bamboo, Paper, Metal, or Silicone?

Which Straw is Better: Bamboo, Paper, Metal, or Silicone?

There are a lot of options for straws these days, but how do you choose?


I grew up with paper straws in the 1960’s and can attest to the fact that they could be a tricky proposition. They were great fun at the start of the drink but there was always the inevitable collapse when they became saturated.

When plastic straws came on the scene it was a boon to soda and shake drinkers everywhere – no more collapsing! Back in the 60’s and 70’s, many people would wash and reuse them.

My family saved so many of them that the straws began edging out the other utensils in the drawer. Eventually, we started throwing them away as everyone did, and still does.

Today, according to industry statistics 500 million plastic straws are used by Americans per day and tossed. And that’s just straws and just in the U.S.!  The numbers from around the world are just too staggering to think about. It’s reported that roughly 8.3 billion straws litter beaches and waterways worldwide – and that truly does suck in a bad way.

Below are Pros and Cons on 4 popular drinking straws materials: bamboo, paper, metal, and silicone.

As far as which is best, it’s definitely a personal choice. Personally, I like the collapsible metal ones with a silicone tip because it’s easy to clean and fits in my pocket – but that’s just me.


1. Paper Straws


Pros:

  • Paper. They decompose very quickly in the landfill or anywhere for that matter.
  • There is a wide variety of cool paper straws on the market to choose from.
  • Best used with reusable cups with a large hole for the straw.

Cons:

  • They can collapse after being wet for too long. A thick frozen drink might require a couple of straws to finish up with.
  • Printed paper straws can compromise the flavor of your drink from the ink used in the prints, or even from the finishing process of the paper itself. I recommend unprinted.
  • You can’t chew on them like a plastic straw. There are always sacrifices 🙁
  • Paper straws get crushed by the lids (with crosscut holes for plastic straws) on convenience store and fast-food drinks. The cup might be paper but the lids are usually plastic.
  • I recommend reusable cups that have built-in holes for straws.

You can get a 100-pack of heavy paper straws at Amazon for around $5. Click here for the link. 


2. Stainless Steel Straws


Pros:

  • Made from stainless steel these straws can be recycled or reused in a myriad of other ways.
  • Convenient to store in purse or pocket as they collapse down to about 3 inches long (7.62cm).
  • Some have silicone tips making it more comfortable in your mouth.
  • Variety of Styles: Straight, slightly bent, and telescopic straws in cases.
  • Portability. Many come in small cases with brushes for cleaning.

Cons:

  • Hard feel in the mouth – less friendly, all business – unless it has a silicone tip.
  • Cold, but that could be a good thing on a hot day with a cold drink!

Personally, I own a couple of thin, steel, telescoping straws with purple silicone mouthpieces that I keep in my bag and my car – love! They’re very handy.

You can get a 4-pack at Amazon for around $9.  Click here for the link.


3. Bamboo or Wood Straws


You can get this 10-pack of Bamboo Straws at Amazon for around $10.  Click here for the link.

Pros

  • Sustainable, compostable.
  • Bamboo is naturally hollow.

Cons

  • Bamboo is only anti-bacterial up to a point.
  • Bamboo is a woody substance and dries much slower than stainless or silicone.
  • Bamboo straws will need to be kept very clean and dry to keep them from having a bacterial-buildup.


4. Silicone Straws


Pros:

  • Silicone is more compostable.
  • Most silicone straws come with bushes for cleaning as well as travel cases or bags for portability.
  • Different Shapes and Colors. These come straight, or slightly bent. Loads of colors.
  • Sizes. I have seen them in both regular and large sizes – which are nice for bubble teas and thick frozen drinks.
  • The feel in your mouth is more like a regular straw unlike the rigidity of wood or stainless steel.

Cons:

  • A bit squishier than normal but so what.

You can get a 12-pack at Amazon for around $7.  Click here for the link.


In Conclusion

I like the idea of having a personal straw. It’s kind of cool – like having a custom-made pool cue (only not as large).

No matter which one you choose, congratulations on taking action to reduce the use of plastic. Let’s all continue moving forward to keep this planet healthy.


Just for Fun: Brief History of Straws

As one would imagine, different types of tubes for drinking beverages have been around for thousands of years. Archeologists have found 5000 year old drinking tubes made of gold and even lapis lazuli. Of course it seems reasonable that there were less noble versions for the masses made of wood, bamboo and even grass tubes for just as long.

Jumping ahead to the 1800’s, rye-grass tubes were the all the rage for drinking one’s favorite beverage. Unfortunately they had an unpleasant habit of melting in drinks and leaving a kind of sludge at the bottom of your glass.

The story goes, that a man named Marvin C. Stone was smoking his cigar and drinking his mint julep when he finally became fed up with the melted goo in the bottom of his glass from a rye-grass tube. He knew he could come up with something better and he did.

With a background in the cigar industry, Mr. Stone developed a similar technique that was used on cigars. He wrapped paper around a pencil and applied a thin layer of glue to hold it together.

He further refined his invention in order to strengthen the straw so that the glue wouldn’t melt in the strongest of alcoholic drinks. In 1888 he obtained a patent for the first paper straw.

The standard paper straw was a hit and continued to gain in popularity.

Then in 1937 a gentleman named Joseph Friedman took it to the next level and came up with the paper “bendy straw”. Versions of it are still with us today. Everybody knows the corrugated straw that bends at the top that our moms give us to drink with when we’re too sick to sit up in bed. It’s still used in hospitals around the world. Brilliant invention!

The next significant change for straws came after World War II ended. This is when wartime plastic was no longer needed and new markets were being sought out. At the time, plastic was cheap and easily shaped into anything making it very handy stuff.

By the 1960s the number of plastic straws being mass produced continued to rise, and well… here we are today.


Remember to Stay Positive!

Even though the world’s plastic problem seems overwhelming, together we can and we are making strides forward. Even the smallest of efforts by everyone will help slow down and minimize our continued plastic impact.

And, it can start with just one straw at a time – every time.


Views: 1

Easy Hummingbird Food Recipe

Easy Hummingbird Food Recipe

Here’s an easy Hummingbird Food Recipe


Warmer weather has finally arrived (yay!) and with it comes the annual migration of hummingbirds zipping about.

The hummers start arriving as early as late April and into early May. They head south again around September.

A couple of years ago, I decided to attract hummingbirds to the yard – they’re so fun to watch!

I found a couple of feeders to hang in my tree but wanted to make sure that I didn’t put anything harmful in them for the tiny flyers, so I got online and checked out a few sites for hummingbird food recipes.

I scored big when I came across this super simple recipe. Best of all it’s easy and basic – the way it should be – NO DYES or other unnecessary ingredients.

According to the Smithsonian’s National Zoo & Conservation Biology Institute, the recipe goes like this:


The Recipe


Ingredients

  • Refined White Sugar (yes – white sugar)
  • Water
  • See exact measurements below


Directions

  1. Stir 1 cup of sugar together with 4 cups of water until the sugar is dissolved. The sugar will melt in room-temperature water fairly fast so there’s no need to heat it first. Stirring thoroughly will help the sugar to dissolve quicker. Walk away for a few minutes, come back and stir some more until it’s ready to pour.
  2. Do NOT add red dye. It’s not good for the birds and it isn’t necessary. If anything about your feeder is red, that’s good enough. 
  3. Fill your hummingbird feeders with the sugar-water and refrigerate any extra sugar water in a glass bottle between refills. It will last about 2 weeks.
  4. Placement: Hang the feeder(s) outside in a cool or shady spot but still visible. Warning: If the feeder is in the direct sun all day, there’s a greater chance of attracting wasps, and the birds will eventually quit visiting. I found out the hard way last summer when one of my feeders was covered with wasps.  ALSO, after several days in the sun the sugar-water will become alcoholic  – another turn-off for the birds.
  5. Refill feeders every few days or as needed.
  6. Be sure to thoroughly clean the feeders often. Hummingbirds are susceptible to infections so clean your feeders regularly and help keep these little guys healthy.


What are the Best Hummingbird Feeders?

Surprisingly, some of the best feeders to attract hummingbirds turns out to be the same inexpensive feeders that are sold everywhere – as long as a couple of specific  features are included. Check out our companion article “Best Hummingbird Feeders” to find out what those features are.


Views: 1

Best Hummingbird Feeders to Attract More Birds

Best Hummingbird Feeders to Attract More Birds

What Features Make the Best Hummingbird Feeders?


Interestingly, the feeders that hummingbirds are most attracted to happen to be the same inexpensive feeders that are sold everywhere.

They’re popular with the birds for a couple of very specific reasons: 1.) there are so many of these feeders sold that the birds recognize them, and 2.) they have a particular set of features that the birds can’t resist.


The Most Important Feature is Color.

A great feeder needs to have a good deal of bright red and yellow in it’s design.


The above inexpensive feeder is one of the most popular with hummingbirds. It can be found in almost any store with a gardening department as well as online.

This specific feeder is such a hit with hummers is due to a couple of things I mentioned above – not only is it bright red with yellow, but it’s also in tens of thousands of yards around the world – the birds actually remember it as a source of food. And yes, they will return to the same yards year after year.

Your odds of attracting them are much higher when they that see their favorite restaurant is in your yard. I have one and it’s always busy. Here’s a link for them on Amazon if you’re interested – Click here.


Note: DO NOT use red dye in any of their food.

Red dye isn’t healthy for the birds, whether it’s purchased at the store or made at home, and it isn’t necessary.

See our companion article “A Simple Hummingbird Food Recipe” for a super easy food recipe that you can make in minutes using just two ingredients.

These little guys deserve the good stuff – not fake red stuff.  Red in the feeder design is enough to attract the hummingbirds. Anyway….


Other Key Features of a Great Feeder:

  • It should have a thick glass bottle for the food.A glass bottle won’t disperse BPA’s into their food source like some plastics will, especially when it gets hot in the summer sun. If the packaging states that the plastic in the product is “BPA Free”  then it’s ok to use.  BPA stands for Bisphenol A, which is an industrial chemical that has been used to make certain plastics and resins since the 1950s. For more information on BPA’s, click here for the Mayo Clinic’s article about this substance.
  • A great feeder will include little “resting bars” at each flower.Hummingbirds need breaks from all that zipping around and a nice place to do that is when they’re at a feeder.   I prefer the plastic “resting bars” over metal because they don’t get as hot in the mid-day sun as metal ones do.
  • It also needs to easily be taken apart and cleaned regularly. Cleaning is super important to keep harmful mold and bacteria from building up which can make them sick.


A Few Words about Cleaning The Feeders

As mentioned above, you need to thoroughly clean the feeder to prevent mold and bacterial growth. You’ll see the mold because it’s black – ewww.

Take it completely apart and clean it at least once every 2 weeks.

  1. Use a mild dish soap and water to clean the bottle and all the parts. Many feeders will come with small brushes but if they don’t, here’s a tipI clean and recycle my old mascara brushes because they fit perfectly into the small feeder holes.
  2. Next, use a large bottle-brush and dish soap to clean the glass bottle that holds the food.
  3. Rinse thoroughly to remove any remaining soap residue, reassemble, fill, and hang on garden hook, or on a tree.


Bottom Line

There are so many cool feeders out there that it can be hard to choose.

The most important things to keep in mind are:

  • The color – prominent red and yellow
  • The material it’s made of – using glass for the food holder, or BPA-free plastic,
  • And little resting bars for them to sit on while feeding.


For a Simple Hummingbird Food Recipe

Check out our companion article “A Simple Hummingbird Food Recipe” that you can make at home in minutes.


Views: 1